概述
本篇是“练习项目”系列的第四篇,主要介绍一下深度图的原理,以及使用深度图实现一些炫酷的效果。这里再次说一下,本系列的文章,大部分是根据网上的博客,把项目从Build
in管线转到新版的URP管线。前面三篇文章,基本没遇到什么因为管线不同而产生的困难。但到了深度图和后处理,新旧管线之间还是有相当大的不同的,在这里绕了不少弯路,希望这里多注意一下。
一、原理
深度纹理实际就是一张渲染纹理,只不过它里面存储的像素值不是颜色值,而是一个高精度的深度值。由于被存储在一张纹理中,深度纹理里面的深度值范围是\([0,1]\)。
模型空间中的顶点,经过MVP变换后,变换到了裁剪空间。在裁剪空间的最后,所以的可见的点都在标准设备坐标系(NDC)中,即坐标坐落在范围\([-1,1]^{3}\)内。在得到NDC坐标后,深度纹理中的像素值就可以很方便地得到了,这些深度值就对应了NDC坐标中顶点坐标的Z分量的值。由于NDC中Z分量的范围为\([-1,1]\),为了让这些值能存储在一张纹理中,我们需要使用下面的公式对其进行映射:
\[
d = 0.5 * z_{ndc} + 0.5
\] 其中,\(d\)对应了深度纹理中的像素值,\(z_{ndc}\)对应了NDC坐标中Z分量的值。
在Unity的前向渲染中,获取深度纹理的具体实现大致如下:Unity会使用着色器替换(Shader
Replacement)技术选择那些渲染类型(即SubShader的RenderType标签)为Opaque的物体,判断它们使用的渲染队列是否小于等于2500(内置的Background、Geometry和AlphaTest渲染队列均在此范围内),如果满足条件,就把它渲染到深度纹理中。这里需要注意一下,Build
in管线会使用ShadowCaster
Pass来得到深度纹理;而新版的URP管线使用DepthOnly
Pass来得到深度纹理。

二、访问深度纹理
在之前Build in管线中,需要在相机上挂一个脚本,脚本里面设置:
1
| Camera.main.depthTextureMode = DepthTextureMode.Depth
|
然后通过_CameraDepthTexture变量访问深度纹理。
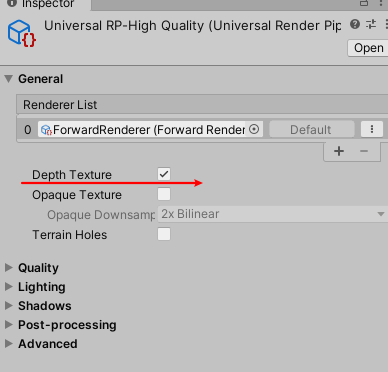
在URP管线中,这一步有了变换。首先,在管线配置文件中勾选深度图:

在Shader中,也是通过_CameraDepthTexture访问深度纹理。但这里比较方便的是,有个内置文件对深度纹理相关的操作做了封装,我们只需要添加相应的引用即可调用。
1
| #include "Packages/com.unity.render-pipelines.universal/ShaderLibrary/DeclareDepthTexture.hlsl"
|
三、后处理流程
URP的后处理与之前Unity的后处理写法完全不一样。原来的OnRenderImage、OnPreRender都失效了。
URP中内置了一些后处理效果,是通过Volume组件管理的。可以在Hierarchy视图中添加Volume组件,然后就可以管理后处理效果。


可以仿照内置的后处理效果,自定义我们自己的后处理效果。
1、添加自定义Override
我们想在Volume中Add
Overrides的时候看到自己定义的Override。模仿内置的代码,可以新建一个脚本,内容如下:
1
2
3
4
5
6
7
8
9
10
11
12
13
14
15
| using System;
namespace UnityEngine.Rendering.Universal
{
[Serializable, VolumeComponentMenu("Custom Post-processing/Print Depth Map")]
public sealed class PrintDepthMap : VolumeComponent, IPostProcessComponent
{
[Tooltip("是否开启效果")]
public BoolParameter enableEffect = new BoolParameter(false);
public bool IsActive() => enableEffect == true;
public bool IsTileCompatible() => false;
}
}
|
这样,在Add Override的时候,我们就可以看到自定义的组件了。
2、实现后处理功能
在上面添加完自定义Override之后,并没有什么效果。这是因为,Override相当于只是数据来源,真正的后处理功能还没有实现。参考内置的后处理源码,可以发现,它们的实现是在PostProcessPass.cs脚本中实现的。在实际的使用中,我也见过直接修改源码,把自定义的后处理跟内置的后处理写到一起的,这是可行了。但考虑到这只是一个练习的项目,尽量不去修改源码。本篇采用的方式,是使用Renderfeature实现后处理。
(1)自定义Renderfeature
首先创建Renderfeature,这样就可以在管线配置文件中设置自定义的Renderfeature了。
1
2
3
4
5
6
7
8
9
10
11
12
13
14
15
16
17
18
19
20
| using UnityEngine.Experiemntal.Rendering.Universal;
using UnityEngine.Rendering.Universal;
public class PrintDepthMapRendererFeature : ScriptableRendererFeature
{
PrintDepthMapPass m_ScriptablePass;
public override void Create()
{
m_ScriptablePass = new PrintDepthMapPass();
m_ScriptablePass.renderPassEvent = RenderPassEvent.AfterRenderingPostProcessing;
}
public override void AddRenderPasses(ScriptableRenderer renderer, ref RenderingData renderingData)
{
var dest = RenderTargetHandle.CameraTarget;
m_ScriptablePass.Setup(renderer.cameraColorTarget, dest);
renderer.EnqueuePass(m_ScriptablePass);
}
}
|

(2)自定义ScriptableRenderPass
可以发现,上面的代码PrintDepthMapPass还没有定义,这是具体的后处理部分,类似Build
in管线中的OnRenderImage方法。
1
2
3
4
5
6
7
8
9
10
11
12
13
14
15
16
17
18
19
20
21
22
23
24
25
26
27
28
29
30
31
32
33
34
35
36
37
38
39
40
41
42
43
44
45
46
47
48
49
50
51
52
53
54
55
56
| using UnityEngine.Rendering;
using UnityEngine.Rendering.Universal;
namespace UnityEngine.Experiemntal.Rendering.Universal
{
public class PrintDepthMapPass : ScriptableRenderPass
{
static readonly string k_RenderTag = "Print Depth Map";
private PrintDepthMap printDepthMap;
private Material depthMapMat;
RenderTargetIdentifier currentTarget;
private RenderTargetHandle destination { get; set; }
public PrintDepthMapPass()
{
var shader = Shader.Find("RoadOfShader/1.3-Depth/Print Depth Map");
depthMapMat = CoreUtils.CreateEngineMaterial(shader);
}
public override void Execute(ScriptableRenderContext context, ref RenderingData renderingData)
{
if (depthMapMat == null)
{
UnityEngine.Debug.LogError("材质没找到!");
return;
}
if (!renderingData.cameraData.postProcessEnabled) return;
var stack = VolumeManager.instance.stack;
printDepthMap = stack.GetComponent<PrintDepthMap>();
if (printDepthMap == null) { return; }
if (!printDepthMap.IsActive()) return;
var cmd = CommandBufferPool.Get(k_RenderTag);
Render(cmd, ref renderingData);
context.ExecuteCommandBuffer(cmd);
CommandBufferPool.Release(cmd);
}
void Render(CommandBuffer cmd, ref RenderingData renderingData)
{
if (renderingData.cameraData.isSceneViewCamera) return;
var source = currentTarget;
Blit(cmd, source, destination.Identifier(), depthMapMat);
}
public void Setup(in RenderTargetIdentifier currentTarget, RenderTargetHandle dest)
{
this.destination = dest;
this.currentTarget = currentTarget;
}
}
}
|
Renderfeature通过调用Setup方法传递数据进来。主要的逻辑是在Execute中实现了,类似于Build
in管线中的OnRenderImage方法。
(3)实现Shader
可以发现,在上面的实现中,会查找Shader来生成一个材质。最后一步要做的,就是实现自己的Shader。这一部分没太多可说的,就是平常的实现Shader的步骤,此处不再赘述。
四、从深度图重建世界坐标
利用覆盖满屏幕的UV值和深度纹理中的深度值,我们可以重新计算出物体在世界空间中的坐标。主要有以下两种实现方式。
1、利用VP逆矩阵重建
将顶点从世界空间转换到裁剪空间,需要经过VP的变换。由于这个变换是可逆的,所以我们可以使用VP的逆矩阵,将顶点从裁剪空间变换到世界空间。
首先,需要在C#中将VP逆矩阵传递给Shader。这一步可以在自定义的ScriptableRenderPass的Execute中实现。
1
2
3
4
5
6
| var camera = renderingData.cameraData.camera;
var proj = camera.projectionMatrix;
var view = camera.worldToCameraMatrix;
var viewProj = proj * view;
customMotionBlurMat.SetMatrix("_CurrentInverseVP", viewProj.inverse);
|
然后,在片元着色器中,可以根据UV值和深度值重建出NDC坐标。
1
2
| float depth = SampleSceneDepth(input.uv);
float4 HCoord = float4(input.uv.x * 2 -1,input.uv.y * 2 -1,depth * 2 -1 ,1);
|
最后,可以使用VP逆矩阵,将坐标从NDC坐标转换到世界坐标。
1
2
3
4
| float4 currentPos = HCoord;
float4 D = mul(_CurrentInverseVP,HCoord);
float4 positionWS = D / D.w;
|
具体过程,可以到CustomMotionBlurPass实例中查看。
2、利用方向向量重建
深度纹理,是一张和屏幕分辨率相同的纹理。而屏幕中所看到的,可以认为是相机的近裁剪平面。所以,深度纹理的四个顶点,可以认为和相机的近裁剪平面的四个点重合的。
(1)计算近裁剪平面的宽、高。

1
2
3
| float tanHalfFOV = Mathf.Tan(0.5f * cam.fieldOfView * Mathf.Deg2Rad);
float halfHeight = tanHalfFOV * cam.nearClipPlane;
float halfWidth = halfHeight * cam.aspect;
|
(2)计算相机到四个顶点的向量

1
2
3
4
5
6
7
| Vector3 toTop = cam.transform.up * halfHeight;
Vector3 toRight = cam.transform.right * halfWidth;
Vector3 forward = cam.transform.forward * cam.nearClipPlane;
Vector3 toTopLeft = forward + toTop - toRight;
Vector3 toBottomLeft = forward - toTop - toRight;
Vector3 toTopRight = forward + toTop + toRight;
Vector3 toBottomRight = forward - toTop + toRight;
|
(3)传递给Shader

如上图所示,假设有个绿点在toTopLeft所在方向上,根据相似三角形,可以得到:
\[
toGreen / depth = toTopLeft / near
\]
上式中,toTopLeft、near都是已知的,而depth可以在Shader中采样深度纹理获得。所以只需要传递\(toTopLeft /
near\)给Shader即可计算出toGreen。
1
2
3
4
5
6
7
8
9
10
11
| toTopLeft /= cam.nearClipPlane;
toBottomLeft /= cam.nearClipPlane;
toTopRight /= cam.nearClipPlane;
toBottomRight /= cam.nearClipPlane;
Matrix4x4 frustumDir = Matrix4x4.identity;
frustumDir.SetRow(0, toBottomLeft);
frustumDir.SetRow(1, toBottomRight);
frustumDir.SetRow(2, toTopLeft);
frustumDir.SetRow(3, toTopRight);
verticalFogMat.SetMatrix("_FrustumDir", frustumDir);
|
(4)在Vertex中判断对应顶点所在的向量

这里需要注意一下,在上面一个步骤传递矩阵给Shader时,构造矩阵的顺序。
可以看到,UV值和对应的索引值正好是二进制的关系,所以可以得出:
1
2
3
| int ix = (int)output.uv.x;
int iy = (int)output.uv.y;
output.frustumDir = _FrustumDir[ix + 2 * iy];
|
看完上述内容,可能有些疑惑:上面只是求出四个顶点的向量,怎么能得出每个像素的向量的呢?这是因为,从顶点着色器到片元着色器,是经过插值的,这样,就可以根据四个顶点的向量,插值得出每个像素的向量。
然后,就可以在片元着色器中重建世界坐标了。
1
2
3
4
| float depth = SampleSceneDepth(input.uv);
float linearEyeDepth = LinearEyeDepth(depth, _ZBufferParams);
float3 positionWS = GetCameraPositionWS() + input.frustumDir.xyz * linearEyeDepth;
|
具体的实现,可以在垂直雾效的例子中找到。
五、实例
1、渲染深度图
这里需要使用后处理来渲染深度图。
按照上面提到的后处理的流程,需要新建一下四个脚本:

在Shader中,采样深度图,转化为\([0,1]\)范围的深度值,输出即可。
1
2
3
4
| float depth = SampleSceneDepth(input.uv);
float linear01Depth = Linear01Depth(depth, _ZBufferParams);
return linear01Depth;
|

代码
2、相交高亮
思路就是判断当前片元的深度值与深度纹理中对应的深度值是否在一定的范围内,如果是的话,就判定为相交。
首先,肯定要在顶点着色器中计算顶点的深度值,传递给片元着色器。然后,由于不需要后处理,所以需要把顶点的屏幕坐标传递给片元着色器。
1
2
3
4
5
6
|
output.positionScreen = vertexInput.positionNDC;
output.eyeZ = -vertexInput.positionVS.z;
float screenZ = LinearEyeDepth(SampleSceneDepth(input.positionScreen.xy / input.positionScreen.w), _ZBufferParams);
|
最后,在片元着色器中进行相交判断。
1
2
3
4
| float halfWidth = _IntersectionWidth / 2;
float diff = saturate(abs(input.eyeZ - screenZ) / halfWidth);
half4 finalColor = lerp(_IntersectionColor, color, diff);
|

代码
3、能量场
在相交高亮的基础上,加上半透明和边缘高亮,就能制造出一个简单的能量场效果。
首先,计算相交部分的数值。
1
2
| float screenZ = LinearEyeDepth(SampleSceneDepth(input.positionScreen.xy / input.positionScreen.w), _ZBufferParams);
float intersect = (1 - (screenZ - input.eyeZ)) * _IntersectionPower;
|
然后,计算边缘高亮的数值。
1
2
3
| float3 normalWS = normalize(input.normalWS);
float3 viewDirWS = normalize(input.viewDirWS);
float rim = 1 - saturate(dot(normalWS, viewDirWS)) * _RimPower;
|
取二者之中的较大值,乘以颜色值。
1
2
3
4
5
| float v = max(rim, intersect);
half4 finalColor = _MainColor * v;
return finalColor;
|

代码
4、全局雾效
思路是让雾的浓度随着深度值的增大而增大,然后进行原图颜色和雾颜色的插值。
这里需要使用后处理,需要新建以下脚本。


代码
5、扫描线
思路与相交高亮效果类似,只是这里需要使用后处理。自定义一个\([0,1]\)范围变化的变量_CurValue,根据_CurValue与深度值的差进行颜色的插值。
这里使用后处理,需要新建以下脚本。


代码
6、水淹
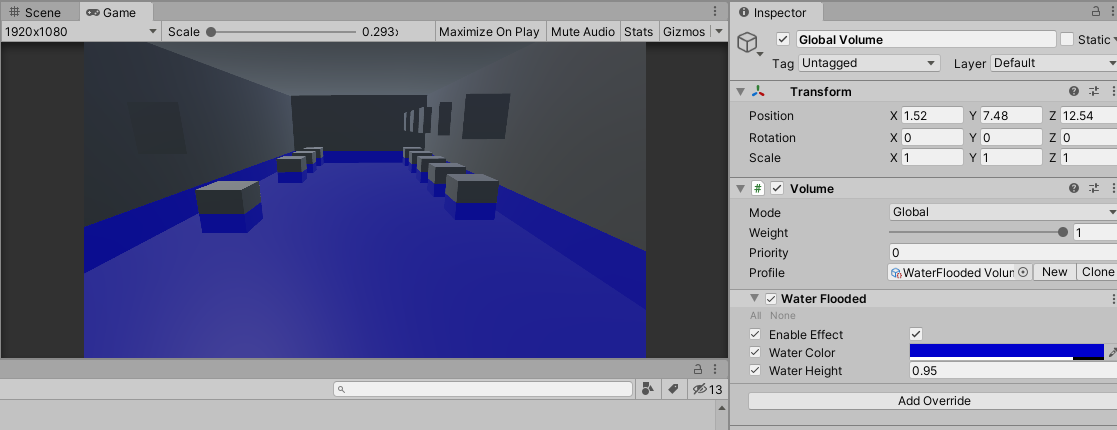
思路是:利用方向向量重建世界坐标,判断该坐标的Y值是否在给定的阈值下,如果是,则混合原图颜色和水的颜色。
这里使用后处理,需要新建以下脚本。


代码
7、垂直雾效
思路是:利用方向向量重建世界坐标,让雾的浓度随着Y值变化。
这里使用后处理,需要新建以下脚本。


代码
8、边缘检测
思路是:取当前像素上下、左右相邻的四个像素,分别计算出上下、左右像素的深度值差异,将两个深度值差异相乘就得到我们判断边缘的值。
这里使用后处理,需要新建以下脚本。

首先,在顶点着色器中,计算上下、左右相邻像素的UV值,传递给片元着色器中。
1
2
3
4
5
|
output.uv[1] = uv + _MainTex_TexelSize.xy * float2(-1, -1);
output.uv[2] = uv + _MainTex_TexelSize.xy * float2(-1, 1);
output.uv[3] = uv + _MainTex_TexelSize.xy * float2(1, -1);
output.uv[4] = uv + _MainTex_TexelSize.xy * float2(1, 1);
|
然后,在片元着色器中,可以根据上面的UV值采样深度纹理得到深度值。
1
2
3
4
| float sample1 = Linear01Depth(SampleSceneDepth(input.uv[1]), _ZBufferParams);
float sample2 = Linear01Depth(SampleSceneDepth(input.uv[2]), _ZBufferParams);
float sample3 = Linear01Depth(SampleSceneDepth(input.uv[3]), _ZBufferParams);
float sample4 = Linear01Depth(SampleSceneDepth(input.uv[4]), _ZBufferParams);
|
最后,就是根据两个差异值相乘得到判断边缘的值。
1
2
3
4
5
6
| float edge = 1.0;
//对角线的差异相乘
edge *= abs(sample1 - sample4) < _EdgeThreshold ? 1.0: 0.0;
edge *= abs(sample2 - sample3) < _EdgeThreshold ? 1.0: 0.0;
return edge;
|

代码
9、运动模糊
运动模糊在游戏中主要用来体现速度感。下面要实现的运动模糊,只适用于物体不同,相机移动的情形。
思路:
(1). 重建运动后的NDC坐标,然后利用VP逆矩阵重建世界坐标;
1
2
3
4
5
6
| float depth = SampleSceneDepth(input.uv);
float4 HCoord = float4(input.uv.x * 2 -1,input.uv.y * 2 -1,depth * 2 -1 ,1);
float4 currentPos = HCoord;

float4 D = mul(_CurrentInverseVP,HCoord);
float4 positionWS = D / D.w;
|
(2).
由于物体是不动的,可以根据上面重建得到的世界坐标、记录下来的上次的VP矩阵,得到运动前的NDC坐标;
1
2
| float4 lastPos = mul(_LastVP,positionWS);
lastPos /= lastPos.w;
|
(3).
利用运动前后的NDC坐标,可以计算出速度向量,在该向量上多次采样、模糊即可。
1
2
3
4
5
6
7
8
9
10
11
12
13
| float2 velocity = (currentPos - lastPos).xy / 2.0;
half4 col = SAMPLE_TEXTURE2D(_MainTex, sampler_MainTex, input.uv);
float2 uv = input.uv;
uv += velocity;
int numSamples = 3;
for(int index = 1; index < numSamples;index++,uv+=velocity)
{
col += SAMPLE_TEXTURE2D(_MainTex, sampler_MainTex, uv);
}
col /= numSamples;
|
这里使用后处理,需要新建以下脚本。


代码
10、景深
景深,是一种聚焦处清晰,其它处模糊的效果。
思路:先渲染一张模糊的图;然后在深度纹理中找到聚焦点出对应的深度值,该深度附近用原图,其它地方渐变至模糊图。
(1). 使用SimpleBlur
Shader渲染模糊的图,这里只是简单的采样当前像素附近的9个像素然后平均,你也可以选择其它模糊算法。
1
2
3
4
5
6
7
8
9
10
11
12
13
14
15
16
17
18
19
20
21
22
23
|
output.uv[0] = uv + _MainTex_TexelSize.xy * float2(-1, -1) * _BlurLevel;
output.uv[1] = uv + _MainTex_TexelSize.xy * float2(-1, 0) * _BlurLevel;
output.uv[2] = uv + _MainTex_TexelSize.xy * float2(-1, 1) * _BlurLevel;
output.uv[3] = uv + _MainTex_TexelSize.xy * float2(0, -1) * _BlurLevel;
output.uv[4] = uv + _MainTex_TexelSize.xy * float2(0, 0) * _BlurLevel;
output.uv[5] = uv + _MainTex_TexelSize.xy * float2(0, 1) * _BlurLevel;
output.uv[6] = uv + _MainTex_TexelSize.xy * float2(1, -1) * _BlurLevel;
output.uv[7] = uv + _MainTex_TexelSize.xy * float2(1, 0) * _BlurLevel;
output.uv[8] = uv + _MainTex_TexelSize.xy * float2(1, 1) * _BlurLevel;
half4 col = SAMPLE_TEXTURE2D(_MainTex, sampler_MainTex, input.uv[0]);
col += SAMPLE_TEXTURE2D(_MainTex, sampler_MainTex, input.uv[1]);
col += SAMPLE_TEXTURE2D(_MainTex, sampler_MainTex, input.uv[2]);
col += SAMPLE_TEXTURE2D(_MainTex, sampler_MainTex, input.uv[3]);
col += SAMPLE_TEXTURE2D(_MainTex, sampler_MainTex, input.uv[4]);
col += SAMPLE_TEXTURE2D(_MainTex, sampler_MainTex, input.uv[5]);
col += SAMPLE_TEXTURE2D(_MainTex, sampler_MainTex, input.uv[6]);
col += SAMPLE_TEXTURE2D(_MainTex, sampler_MainTex, input.uv[7]);
col += SAMPLE_TEXTURE2D(_MainTex, sampler_MainTex, input.uv[8]);
col /= 9;
|
(2). 传递上面生成的模糊的图给DepthOfField Shader;
1
2
3
4
5
6
| cmd.GetTemporaryRT(blurTex, m_Descriptor, FilterMode.Bilinear);
var blurLevel = customDepthOfField._BlurLevel.value;
simpleBlurMat.SetFloat("_BlurLevel", blurLevel);
Blit(cmd, source, blurTex, simpleBlurMat);
cmd.SetGlobalTexture(blurTex, blurTex);
|
(3). 根据焦点混合原图颜色好模糊图颜色。
1
2
3
4
5
6
7
| half4 col = SAMPLE_TEXTURE2D(_MainTex, sampler_MainTex, input.uv);
half4 blurCol = SAMPLE_TEXTURE2D(_BlurTex, sampler_BlurTex, input.uv);
float linear01Depth = Linear01Depth(SampleSceneDepth(input.uv), _ZBufferParams);
float v = saturate(abs(linear01Depth - _FocusDistance) * _FocusLevel);
return lerp(col, blurCol, v);
|
这里使用后处理,需要新建以下脚本。


代码
参考


